Panopto Remote Recorder Guide
How to use Panopto to record lectures remotely (Windows only)
Introduction
Installation of remote recorder
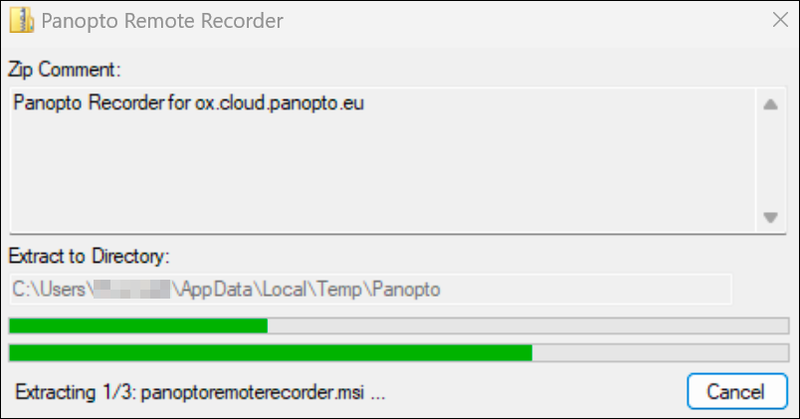
- Download the Remote Recorder for Windows 10 or higher from the Downloads and Resources page. Once the download has finished, navigate to your downloads directory and open panoptoremoterecorder.exe to prepare the installation:
- When the set-up window loads, fill in the Panopto Web Server address as per the following: ox.cloud.panopto.eu
When filling in the Description for the Remote Recorder it is recommended to use Replay's naming conventions:
Department Name - Building Name - Lecture Room Name:
E.g. Engineering - Thom Building - Lecture Room 1
You can also define where local recordings will be stored before they are automatically uploaded to the cloud portal. However, in most instances, local recordings will be automatically deleted after successful upload.
NB. New Panopto Remote Recorder installation(s) will require a registration key to be entered on the first set-up page. A generic key for the 2023/24 academic year can be found on the Downloads and Resources page.
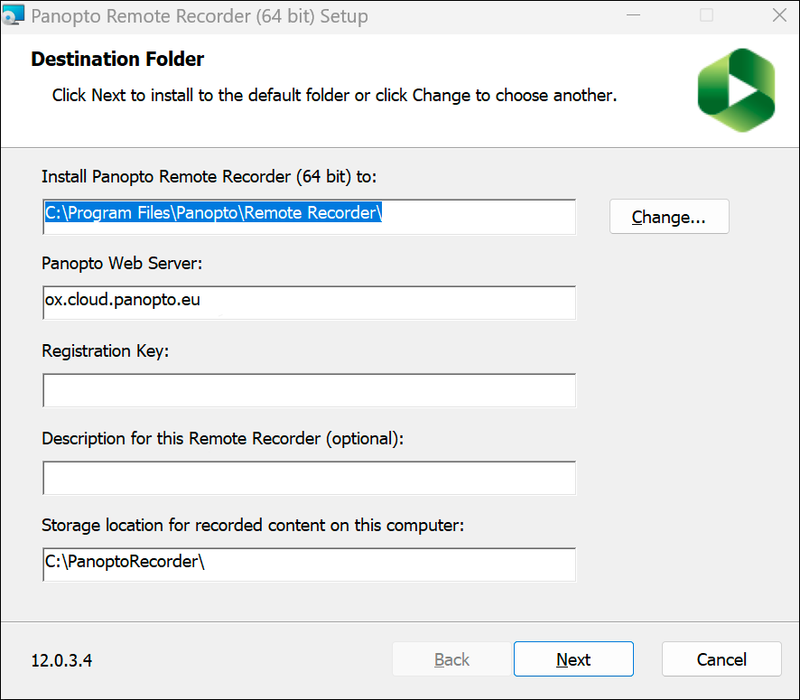
- Once this has been completed click on the 'Next' button to move on to the 'Ready to install' page:
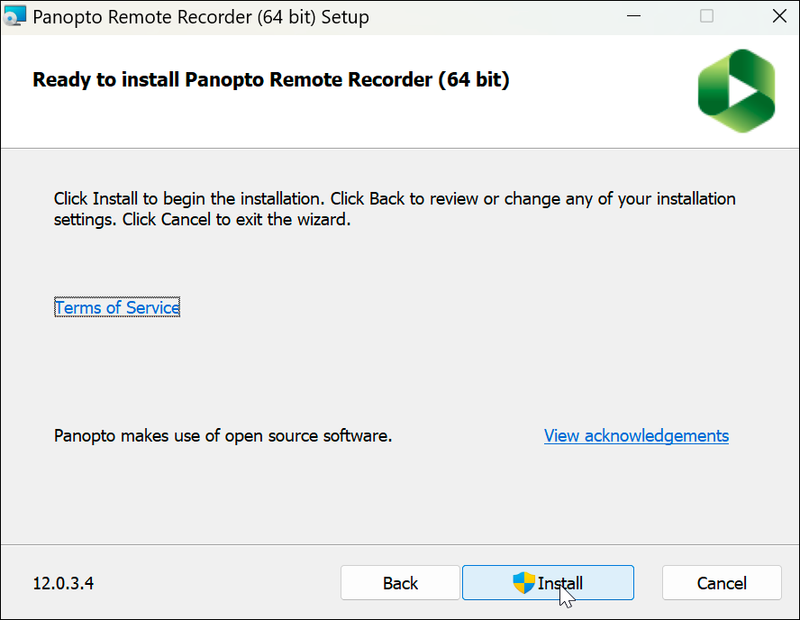
- Clicking 'Install' will begin the installation process. Click 'Yes' on the security pop-up that follows, to allow the installer to continue.
- The installer will also create an icon in your system tray located within the taskbar. There are several different icons that will show you the current status of the remote recorder on your computer. Please check them below to find out what each one means:
- Once the remote recorder has been successfully installed, contact the Replay service to inform them which staff users need access and the level e.g. admin or creator.
You can do this by sending an email to replay@it.ox.ac.uk with the following information: name, email address, SSO, remote recorder name you have added and the user's responsibility, Scheduler, or Manager.
- Schedulers create a timetable for lectures taking place. This includes configuring the times, dates, and which PC is presenting the lecture.
- Managers have control of the recording configuration such as audio and video inputs, as well as scheduling a timetable for the lectures. In most instances, the IT Officer of a department would take on the role of a Manager whilst the administration team would take on the role of Scheduler.
Please make sure that users have logged into Replay through the Canvas at least once so that an automatic username is created for them.
Please note:
You will need to email Replay every time you add a new remote recorder instance; including operating system installs, re-installs and re-imaged computers.
Once the Replay service has completed the back-end updates, they will notify you to confirm the users are ready to use the remote recorder.
Please allow 24 hours for this process to complete.
How to schedule a recording
Scheduling recordings allows a user to set up a series of recordings in advance for a particular period of time.
To schedule a recording you will first need to log into your Canvas course using your SSO. From the left-hand sidebar, click on Courses > (select course) > Panopto Recordings. This will take you directly to the Panopto integration within Canvas.
Ensure you are in the correct folder, then click on the 'Create' button at the top of the page. This will provide you with the below drop-down menu:
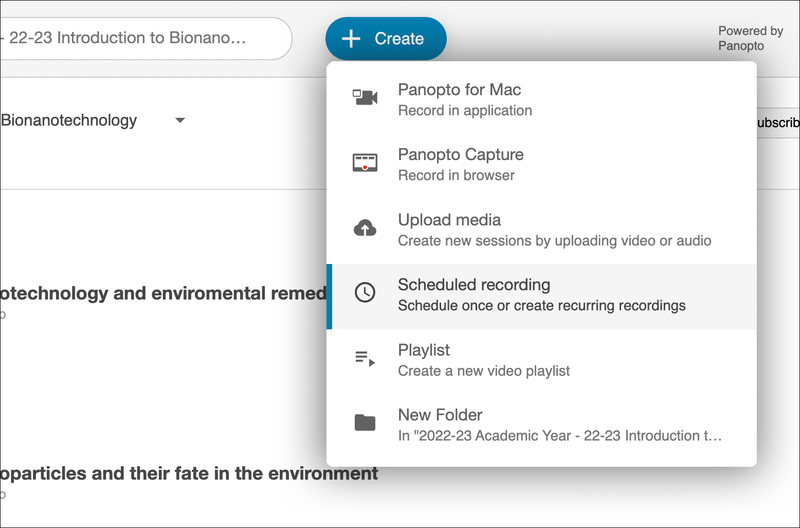
Click on the 'Scheduled Recording' tab. A form will then open up on top of your current window. You will then need to complete the form by filling in the blank fields with the schedule of your lectures.
1. Session Information
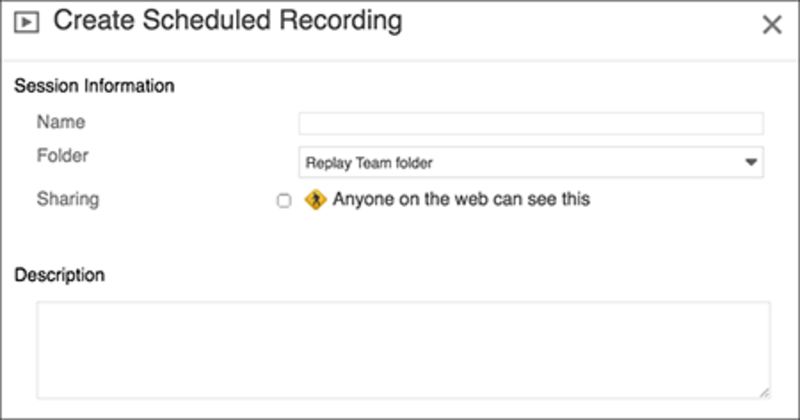
The Name field can be the module or the lecture title. This name will be seen by the students and staff or anyone who can access it once the recording is published.
The Folder drop-down will give you a list of folders that you have created within Replay. You can create subfolders inside Replay. All of these can sit under a parent folder that corresponds with the course title. You can also select Assignment Folders. These are folders that are hidden from the students before they are published. It means you can place the videos in a private area so that they can be edited after the recording. Once edited and finalised, the video can then be moved into the parent folder where it can be published and seen by the students.
Please leave the Sharing tab unticked. This would allow external individuals to see the recordings using the URL that is created with each recording. Replay has a limited number of viewing hours per year. We do not share the videos publicly as these viewing hours are then depleted at a significant rate. Replay is intended for internal use only. To share the videos publicly or to embed a video on an external site we ask you to export the recording out of Panopto first.
2. Source
When selecting a source you can choose to use either 1 or 2 remote recorders. The primary recorder and the secondary recorder.

Most lecture theatres or seminar rooms have Replay installed on one machine - usually the PC that the lecturer is presenting from. In other, more complex situations, a remote recorder can be installed on the presenting PC as well as another PC. There are several reasons for this, but this is covered in a section below, entitled 'Dual Recorders'. The Replay remote recorder would, therefore, be installed on two machines in the same lecture theatre. The primary remote recorder will need to be the one that has an audio input. If a USB microphone has been plugged into the machine that is being recorded from, then this is your primary. You will need to make sure that both machines are identified by their unique names that are given in the installation process.
3. Schedule
The remote recorder allows the user to schedule a series of lectures over a long period of time. If a lecture takes place on a particular day of the week and is repeated each week throughout the rest of the term, then you can tick the 'Repeat Recording' checkbox.
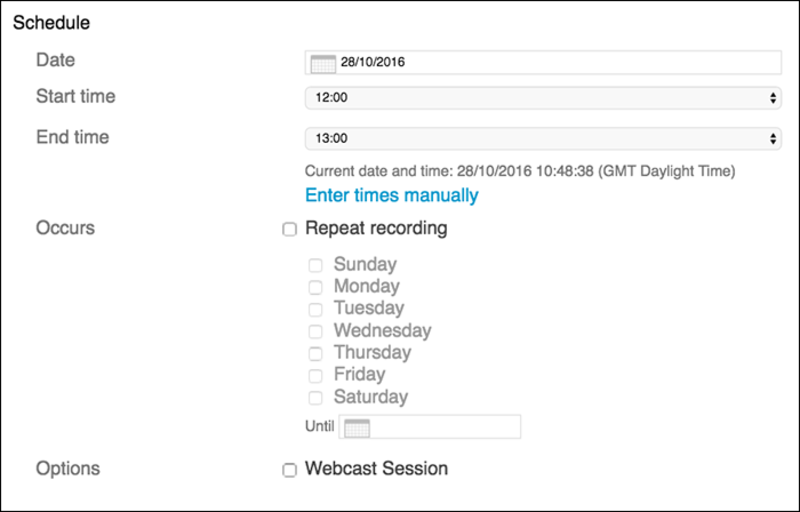
Times can be auto-generated or added manually for more fine-grained control of start and end times. Please be aware that it is not possible to schedule overlapping recordings on a single machine.

If there is no lecture following the current lecture then you can add a later finish time for the lecture such as 13:08. This gives you extra lead time at the end without the recording finishing too early. Be aware, if there is a following lecture, creating a later finish time will interrupt the next lecture recording. Always check the room timetable.
4. Quality Settings
Quality settings are dependent on your PC specification. Below is the settings toggle:
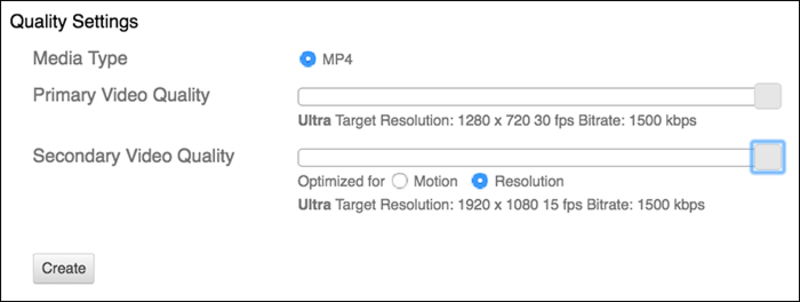
In most instances, we recommend leaving these settings at their defaults. The Secondary video should be optimised for Resolution.
Once the form is complete, click 'Create'. This will then schedule all of the recordings you have made into your folder.
Dual Recorders
What is dual recording?
Dual recording allows the use of two remote recorder instances (each installed on a different PC) to record and/or stream to a single Panopto session.

Why would you use dual recorders?
A dual recorder setup is often used in large teaching spaces where the projector, camera, and audio matrix/receivers are situated in an AV booth, perhaps at the back of the room. In these situations, it is often difficult to run cables from the devices in the booth to the presentation machine at the front, which may be a laptop with limited inputs.
Instead, a dedicated Panopto PC (usually a desktop PC) can be situated in the AV booth, and the primary audio (microphone) and video (camera) sources can be connected to it. Often, a projector feed is also connected to this PC (via a VGA or HDMI capture card) as an additional secondary input. This PC is known as the primary remote recorder.
The presentation PC, usually located on the lectern, also has the remote recorder installed, and during scheduling, can be chosen as a secondary remote recorder to capture the slides. No audio will be captured from the secondary remote recorder.
Even when capturing a direct projector feed on the primary PC, it is still sometimes useful to capture slides on the secondary recorder, since Panopto will upload the PPTX file in order to index all text for searching, as well as to automatically generate chapter markers based on slide transitions.
Webcasting and Livestreaming
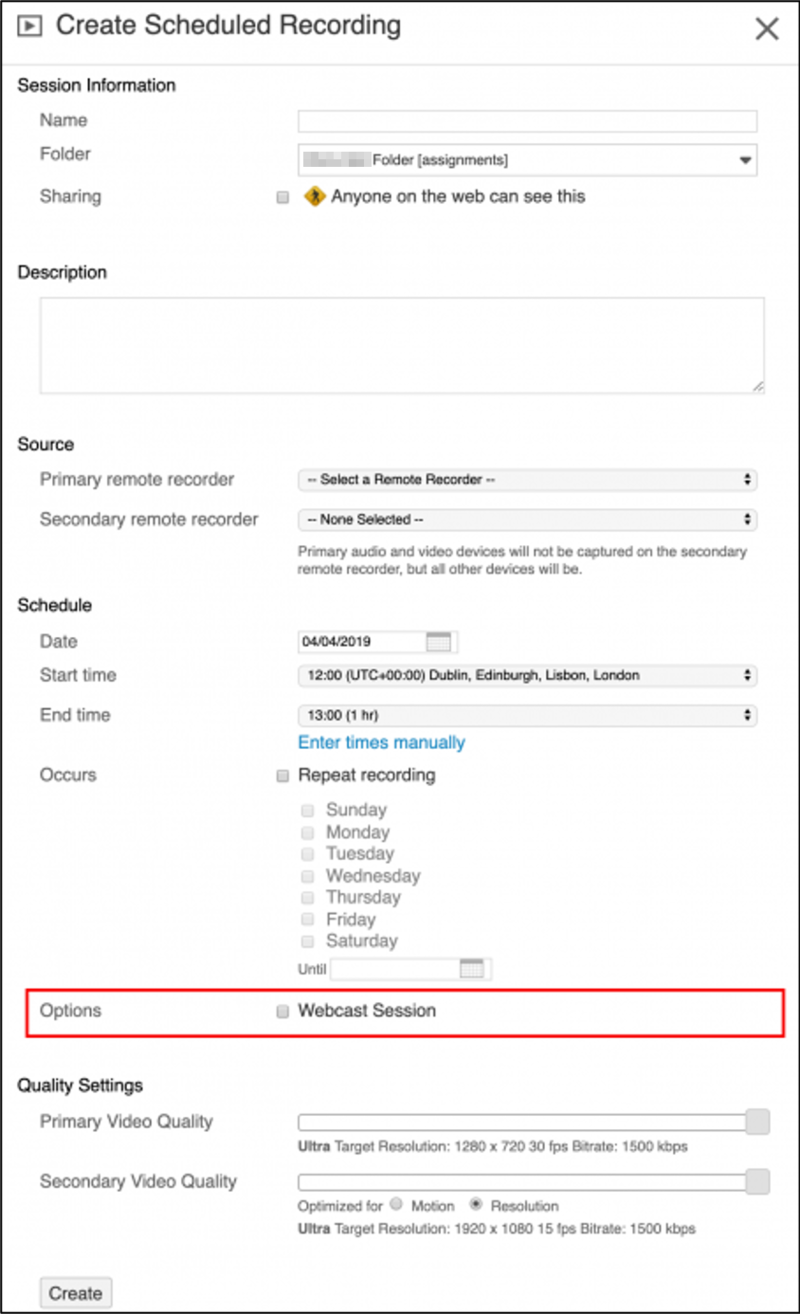
Terms used interchangeably, these are Panopto recordings that are also broadcast live over the internet, with a typical delay of between 30-90 seconds. Live streaming is a useful tool for engaging with a wider audience and is appreciated by those who cannot attend the event in person. Live streaming is also used by departments for overspill purposes, allowing lectures to be broadcast live to another room in the same building if the main teaching space is full. To set up a live stream, simply check the 'Webcast Session' option when scheduling the recording. It's located in the 'Schedule' section, under 'Schedule a Recording'.
Once scheduled, you will be provided with a URL that can be shared with users. This sharing method is typically used when streaming to the public (outside of Oxford University). You will need to change the share settings of the scheduled session to be "Anyone with the link" when doing this, so that users who are not logged in can watch the event. If viewers are Oxford University staff or students, they can instead access the session via the appropriate Canvas course.
You can also edit the scheduled session to add additional metadata, including an image, to create a branded "waiting area" page whilst users are waiting for the stream to begin.
Please bear in mind that Panopto is designed primarily as a lecture capture tool, so the webcasting functionality is limited compared to professional streaming solutions such as Livestream.com. Users who are not logged in will not be able to post questions during the livestream. Live statistics can be viewed during the session. We strongly advise that you do not use Panopto live streaming for widely advertised VIP events, since the University has a limited number of "viewing hours" included in its Panopto licence.
Get support
Local IT and administration staff provide your first line of Replay support
For more complex queries, contact the central Replay team


